Friday, April 12, 2024

How to Leave Slack Channel Workspace Without Waiting for Admin or Owner

 How to leave a slack channel workspace? 


Can't leave a slack channel workspace. 

Feeling trapped in a workspace slack channel and can't just right click and select "Leave Channel" because you're told its the general channel and so you can't leave unless the channel admin or owner removes you. 

Well, found a hidden gem of steps to remove yourself from a channel without an admin or slack channel owner having to do it. 

How do I get out of a channel in Slack?

Be logged in and access the settings URL for the channel. 

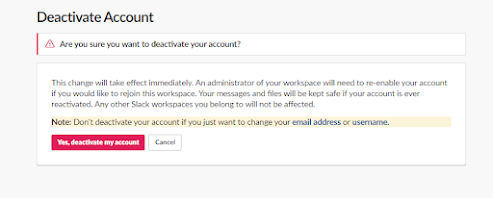
Then click deactivate account. 


Leave slack channel confirmation. 

Click Deactivate my account button and done leaving the channel. The terminology is "deactivating", not leaving.   


Confirmation. 


Please share..  thank you. 

Sunday, February 25, 2024

Network Solutions DNS DKIM Record Example

Example of a Network Solutions DKIM DNS Record 

Sometimes a picture is better than a long explanation. Unfortunately, such an example was not findable at the time of this post and so a simple example of a DKIM DNS entry using Network Solutions DNS manager is presented here. 
 
Image of a Correct DKIM record in Network Solutions

There are many sites that explain the function of a DKIM record, in this post, it's a simple example for adding a DKIM record in Network Solutions DNS manager. 

Network Solutions offers advanced DNS management tools.  Their platform allows for seamless control over your domain's DNS settings, ensuring that your website remains accessible and performs optimally.

 A DKIM (DomainKeys Identified Mail) record is a critical component in email security, typically added to a domain's DNS (Domain Name System) records to help prevent email spoofing. By enabling DKIM in your DNS settings, you essentially allow receiving email servers to verify that the messages purportedly from your domain were indeed authorized by the domain's administrators. 

Network Solutions Manage DNS DKIM Sample 

Locating a simple Network Solution example screen shot or even plain text version of a DKIM record entry was not clean and easy. Many referenced links often would take my browser to a service to create the record and not real steps to adding in Network Solutions.  The generators often referenced creating an account and subscribing and paying for a "service".  Such services are useful, as they create the server-side portion of the record. That server-side record data contains encryption and all the rest that goes into DKIM.  

Since the mailboxes were hosted my Microsoft 365 Exchange online, server-side components were not needed. That's handled my Microsoft - just need to know how to add the DKIM record in Network Solution's DNS manager (yes, it was the first time adding a DKIM).  

A simple screenshot for someone a little experienced already with DNS can be so useful. 

Selectors can be found with PowerShell connected to Exchange online. This post does not go into detail about connecting to exchange online with PowerShell. Below would be the command however to retrieve the CNAME records from Microsoft .

The output shows both DKIM CNAME selectors (thank you m365info.com for the sample command that works).

PS C:\> Get-DkimSigningConfig "m365info.com" | FL *CNAME

Selector1CNAME : selector1-m365info-com._domainkey.ms365info.onmicrosoft.com
Selector2CNAME : selector2-m365info-com._domainkey.ms365info.onmicrosoft.com

DKIM DNS CNAME Record in Network Solutions DNS manager. Access the Advanced DNS Record Manager in Network Solutions and add the record as the example shows. 


Notice the alias portion is a direct copy paste of the PowerShell results. Do the same for the second selector.  The tricky part, only because it's different from standard common DNS entries, was the portion above the "Alias to". That's where the selector name goes and must include ._domainkey

Please share and comment... 


Wednesday, January 3, 2024

How to Enable (RDP) Remote Desktop Service Using Regedit

Enabling RDP Using Windows Registry


1.Enable RDP Remote desktop on local desktop or laptop.

2.Enable remote desktop RDP on remote desktop or Laptop.

Most often you need to only enable RDP on the local computer or desktop, however circumstances arise when you need to access another computer on the network and would like to enable terminal server or RDP services on the remote computer. Both scenarios are covered below. Although extremely similar, the significant difference is for the remote desktop connecting to the remote computer's registry first is imperative.  

1. Enable RDP on Local computer

Open the registry editor. 

Click the start button and start typing Regedit in the search box. 


Using the registry to enable RDP, terminal server services on local or remote computer or server.


Click regedit.exe to open the registry editor to edit and enable RDP (Remote Desktop Protocol)

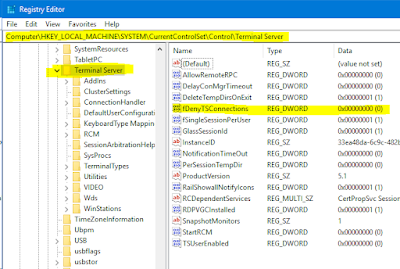
Navigate to 

Computer\HKEY_LOCAL_MACHINE\SYSTEM\CurrentControlSet\Control\Terminal Server


Double Click fDenyTSConnections on the right side and change the value to 0 (zero) and click OK to save the new setting to allow RDP connections.  


Registry change to enable remote desktop protocol.


RDP (remote desktop) connectivity to the local computer now enabled. A reboot is not required.  


Please share this post or link. 


2. Enable RDP Remote Desktop on remote computer. 

The steps to enable RDP on a remote computer is similar to those performed on the local computer or laptop. The registry setting that needs to be changed is the same. The main significant difference is you'll have to remote connect the registry editor to the target computer on the network, of course common caveats remain. First of all, there needs to be network access to the remote computer. 

Open the registry editor following the same steps for the local computer. Once open, click File then select Connect Network Registry from the dropdown menu. 


use remote resitry to enable RDP remote desktop access to a remote computer.


Enter the computer name of the desktop or laptop you are trying to enable RDP desktop access using the registry on the network. You can use the computer name or IP address. Click okay. 

If remote registry service is enabled, you could receive a prompt to login depending on scenarios. For example, if both Windows desktops are members of the domain, you access will be quick, and no prompt will be presented. If the two desktops are in a workgroup, you'll receive a prompt to login. You'll have to enter a username and password of an account that has Admin credentials on the remote desktop. 


Enable RDP remote desktop remotely over the network.


The following message may be displayed which indicates the remote registry service is not running on the remote windows desktop or laptop computer. 

Error , unable to connect to remote registry over the network.

In this case, the service was disabled. Of course, if you have direct access to the desktop to review services, then you have access to enable RDP locally on the computer too. If you do not, if there is someone present at the remote computer to enable for you, then that's one path or else you'll have to enable it next time you are present at that computer's console. I will enable to proceed with the steps to enable RDP remotely. . .. I'll be right back ;)  . . 


Windows registry service, enable or disable to permit or deny access to remote registry editing.


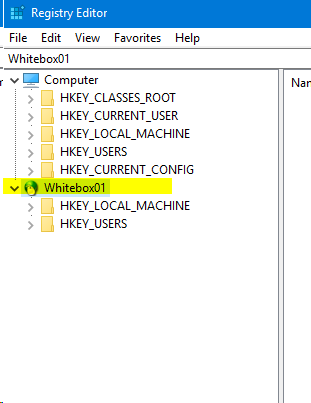
Upon connecting, you'll see the remote computer listed in registry editor. 

Registry editor with remote computer connected. remote computer displayed on the left window pane of registry editor.


Expand the remote computer and go to the same registry key as done for the local computer's registry. 

Terminal server, RDP service registry key.


Double Click fDenyTSConnections on the right side and change the value to 0 (zero) and click OK to save. 


RDP is enabled on the remote computer. This works best on a domain. If both computers are in a workgroup (the same workgroup), it's best if the admin accounts match on the two computers if they are not members of active directory domain. 


Please share.


RDP manager software won't help in changing registry settings to enable RDP protocol on desktop, computer or servers. However, centralizing RDP connections has become an integral part of modern work environments, and our robust management solution offers a seamless way for users to securely access their work desktops from anywhere in the world. By centralizing RDP connections, organizations can reap numerous benefits, such as streamlined administration and management, as well as increased productivity. Our platform boasts a user-friendly interface.  Administrators could with only a browser easily maintain a list of RDP connections that are readily available to administrators and users.  That simplifies the task of IT administrators by managing all RDP connections centrally. This centralized approach also facilitates access for users, enabling them to securely connect to their desktops using remote desktop client RDP connections without disrupting their work routine. With centralized RDP connections, employees have the flexibility to work from any location and at any time, while organizations maintain complete control over their desktop environment. In summary, our management solution provides businesses with an efficient remote access experience using RDP, ensuring a simple and effective controlled desktop environment for their users online.


By centralizing RDP connections, organizations can enjoy several benefits, including streamlined administration and management, and increased productivity. Our web based online platform provides a simple and intuitive interface that allows IT administrators to manage all RDP connections centrally. This centralized approach also simplifies access, allowing users to access their desktops using remote desktop client RDP connections securely without disrupting their work routine. With centralized RDP connections, employees can work from anywhere, at any time, while organizations maintain complete control over their desktop environment. In conclusion, centralizing RDP connections with our management solution online is the perfect way for businesses to ensure an efficient and secure remote access experience for their users.




Friday, September 16, 2022

QuickBooks Error 1603

 Fix Error 1603 when you install QuickBooks Desktop

Intuit QuickBook installation of version 2022 but solution applicable with even the latest QB version. 

When trying to install QuickBooks, an error 1603 is displayed. Suggestion to solve QuickBooks installation error 1603 is to Run the Install Diagnostic Tool from the Intuit Tool Hub but that software also would not install. it had an error, coincidentally , the same error.  So QuickBooks installer and the diagnostic tool to find and correct installation errors may have the 1603 QuickBooks installation error. 

Please share this post and link if my solution helped solve your QuickBooks Error 1603 installation problem https://pctechnow.blogspot.com/2022/09/quickbooks-error-code-1603-how-to-fix.html so others could find it easier 


Error 1603 - QuickBooks - Intuit - Windows 10

I had this error trying to install on Windows 10. The solution I thought of, not from an online support source, and found to work was to start the installation process by first changing the properties of the installer and make it Windows 7 compatible. That got me past error QuickBooks error 603 on Windows 10. 

Right click the file then select properties. Click compatibility, check the box for compatibility mode, change the OS version . 


Save,  and then run the installer again. I also right click and select run as Administrator when starting the QuickBooks install software.  


Leave a comment if this worked for you. 


Please share post link so others can find this solution faster and easier. Thank you.   

Share/Save/Bookmark


Tuesday, June 14, 2022

Manually Sync AD to Azure

 Sync active directory changes to Azure Manually. 


Changes from local active directory to Azure are not instantaneous. Except password resets, all other changes to any property of user accounts or group accounts take up to 30 minutes to be synced to Azure. 
You can speed up the process of getting the changes just made in your local AD to Azure by running a manual sync. 
Login to the Azure AD connect server (often called a sync server) . 
open a PowerShell command window and enter the following command . The command will submit all recent changes to Azure. 

        PS C:\> Start-ADSyncSyncCycle -PolicyType Delta 

Be sure to include Delta at the end of the command. This tells the syncing command to process changes. Don't run /initial. running with the initial option could cause some complications. 
If you have a large or spread out domain infrastructure such as domain controllers in different locations, it's best to run an active directory syn to sync all the local domain controllers first. 

Replicate and Sync ALL Domain Controllers

This can be done from a normal command prompt with admin privileges. This command will sync all domain controllers. 
 
Run   repadmin /syncall  /APeD  


Please share so others can find this post and solution faster. Thank you

Share/Save/Bookmark


Monday, May 16, 2022

Display Logged on User Account SID


Simple Command Line to Display Logged on SID

A simple method to display the SID of the logged in user domain user account is using a command that's common but not often used. It's been part of the MS Windows operating systems since before Windows 10 and present in server additions as well.    

The whoami command when run without options will display the currently logged in user account If you are providing remote support, this command is helpful if you are remotely accessing the desktop and troubleshooting an issue that requires knowing the user's SID such as user profile issues.  

If your not familiar with the whoami command at all try it out. On a desktop logged in with a Domain account, open a command prompt and then type the command whoami and hit the enter key. The command's output displays just the currently logged in user. 

Run the command again (up arrow) and add the simple option  /user  and it will display the SID of the user like this: 

           C:\>whoami /user 


Display local SID of non-domain user account 

If the user is not a domain account, like a desktop at a remote office or home display the local windows account SID use the following command line 
      
                     wmic useraccount where name='username' get sid


Share/Save/Bookmark


Working on user profiles or other user account issues on for Windows or other operating system platforms with the help of online desktop control. Enhance your Support Service level with Software for Desktop Support Online.  Take on small desktop application issues or the more affecting server problems. Even if you have a remote access software, add an affordable backup and alternative of Online Remote Support Software to remotely access desktops online and provide support.  No agent or preinstalled software required. No plugins or browser extensions for remote desktop screen sharing sessions using 4RemoteSupport. Their service offers No cost increase ever and an unlimited number of sessions. Try for Free. 


Wednesday, April 27, 2022

Veeam Backup Using Azure Storage Blob

Veeam Backup and Azure Storage Blob

Support your company better with offsite backups


  Share/Save/Bookmark

Veeam Backup Using Azure Storage Blob creates a reliable offsite backup. Support  and protect your company by using this combination of Azure storage and Veeam's capabilities to utilize the storage helps create a reliable recovery scenario that can cover many of the "what happens if" situations. Situations that are not only imaginable by disasters for those that could be caused by the ongoing daunting threats that some from real-world scenarios like from ransomware. 

What if your servers and data was captured ransomware? What do you do? Your backups have also been locked by ransomware and recovery would only be available by an offsite protected copy of your backup data.  To better support your company, maintain an offsite copy of your backups.  

Veeam not only gives it's admins a way to support their company better by having a secure and reliable method to recover from server failures, virtual servers or physical own hardware servers, but also lets you keep a copy in the cloud. 

Chances are you are already using Azure for email through Microsoft 365 online exchange, so access to having a datastore available to have your company survive a crisis is already there. You may have to expand your subscription to include the required amount of storage , but that requires very little effort to do.

Creating storage for Veeam to offsite backups is straight forward. It's a generic generation 2 blob. Nothing fancy, nothing special. Standard performance because it's an offsite backup and won't require high end speed because it's not live data.  The blob is all defaults. You'll just have to give the storage account a name and create a new resource group, and of course select your subscription. The process is simple on Azure. Take note of the key generated for the blob, because that has to be entered into the Veeam configuration. Follow this Veeam guide, it worked for my company:  

https://helpcenter.veeam.com/docs/backup/vsphere/azure_repository_name.html?ver=110

 Once you have the Azure storage setup, again it is a default storage blob, you need for Veeam configuration: 

To add Microsoft Azure Blob storage, do the following:

To add Microsoft Azure Blob storage, do the following:

  1. Specify object storage name
  2. Specify object storage account
  3. Specify object storage settings
  4. Finish working with the wizard

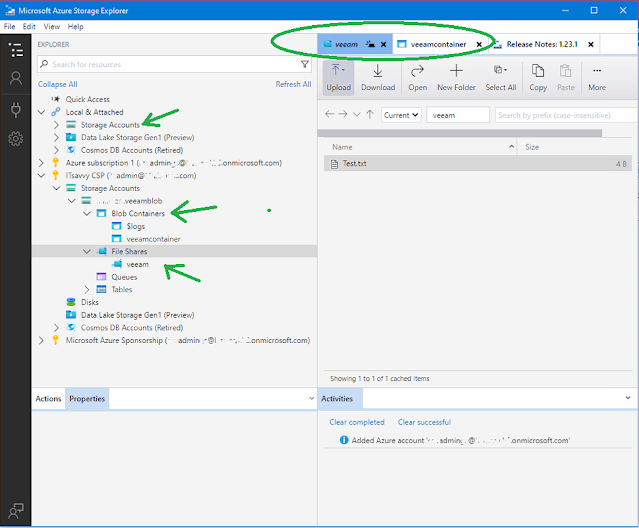
 Not mandatory but after completion, Microsoft has a tool called  Microsoft Storage Explorer. the tool works great to have a a view of all your storage containers and even aces them without a browser. 

Microsoft storage explorer could be downloaded from here, login is not required to download from Microsoft.  

    https://azure.microsoft.com/en-us/features/storage-explorer/

The tool is not required to access, support, and manage your storage accounts , containers, etc. but can be used to support and manage the setup and offer further insight that's not so quickly attainable using only browser access to Azure or using even the Azure management console tool. 


Share/Save/Bookmark  

technical issues related to Veeam or azure storage configuration can be address  remotely with software that enables remote access of desktops and server over the Internet. Level-up your Support Services with Online Remote Support Software. Connect to end-user devices with full screen-sharing remote control access to assist in simple desktop application problems online or connect to servers and even network devices to work on the tougher technical problems over the web.