Enabling RDP Using Windows Registry
1.Enable RDP Remote desktop on local desktop or laptop.
2.Enable remote desktop RDP on remote desktop or Laptop.
Most often you need to only enable RDP on the local computer or desktop, however circumstances arise when you need to access another computer on the network and would like to enable terminal server or RDP services on the remote computer. Both scenarios are covered below. Although extremely similar, the significant difference is for the remote desktop connecting to the remote computer's registry first is imperative.
1. Enable RDP on Local computer
Open the registry editor.
Click the start button and start typing Regedit in the search box.
Click regedit.exe to open the registry editor to edit and enable RDP (Remote Desktop Protocol)Navigate to
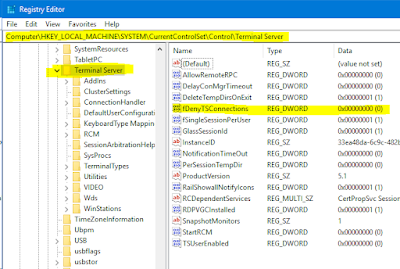
Computer\HKEY_LOCAL_MACHINE\SYSTEM\CurrentControlSet\Control\Terminal Server
Double Click fDenyTSConnections on the right side and change the value to 0 (zero) and click OK to save the new setting to allow RDP connections.
RDP (remote desktop) connectivity to the local computer now enabled. A reboot is not required.
Please share this post or link.
2. Enable RDP Remote Desktop on remote computer.
The steps to enable RDP on a remote computer is similar to those performed on the local computer or laptop. The registry setting that needs to be changed is the same. The main significant difference is you'll have to remote connect the registry editor to the target computer on the network, of course common caveats remain. First of all, there needs to be network access to the remote computer.
Open the registry editor following the same steps for the local computer. Once open, click File then select Connect Network Registry from the dropdown menu.
Enter the computer name of the desktop or laptop you are trying to enable RDP desktop access using the registry on the network. You can use the computer name or IP address. Click okay.
If remote registry service is enabled, you could receive a prompt to login depending on scenarios. For example, if both Windows desktops are members of the domain, you access will be quick, and no prompt will be presented. If the two desktops are in a workgroup, you'll receive a prompt to login. You'll have to enter a username and password of an account that has Admin credentials on the remote desktop.
The following message may be displayed which indicates the remote registry service is not running on the remote windows desktop or laptop computer.
In this case, the service was disabled. Of course, if you have direct access to the desktop to review services, then you have access to enable RDP locally on the computer too. If you do not, if there is someone present at the remote computer to enable for you, then that's one path or else you'll have to enable it next time you are present at that computer's console. I will enable to proceed with the steps to enable RDP remotely. . .. I'll be right back ;) . .
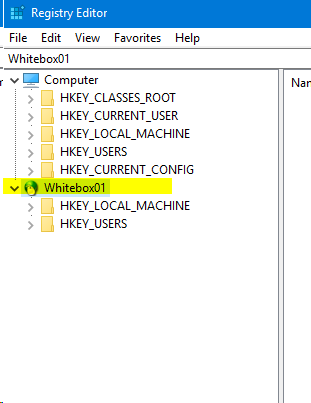
Upon connecting, you'll see the remote computer listed in registry editor.
Expand the remote computer and go to the same registry key as done for the local computer's registry.
Double Click fDenyTSConnections on the right side and change the value to 0 (zero) and click OK to save.
RDP is enabled on the remote computer. This works best on a domain. If both computers are in a workgroup (the same workgroup), it's best if the admin accounts match on the two computers if they are not members of active directory domain.
Please share.

RDP manager software won't help in changing registry settings to enable RDP protocol on desktop, computer or servers. However, centralizing RDP connections has become an integral part of modern work environments, and our robust management solution offers a seamless way for users to securely access their work desktops from anywhere in the world. By centralizing RDP connections, organizations can reap numerous benefits, such as streamlined administration and management, as well as increased productivity. Our platform boasts a user-friendly interface. Administrators could with only a browser easily maintain a list of RDP connections that are readily available to administrators and users. That simplifies the task of IT administrators by managing all RDP connections centrally. This centralized approach also facilitates access for users, enabling them to securely connect to their desktops using remote desktop client RDP connections without disrupting their work routine. With centralized RDP connections, employees have the flexibility to work from any location and at any time, while organizations maintain complete control over their desktop environment. In summary, our management solution provides businesses with an efficient remote access experience using RDP, ensuring a simple and effective controlled desktop environment for their users online.
By centralizing RDP connections, organizations can enjoy several benefits, including streamlined administration and management, and increased productivity. Our web based online platform provides a simple and intuitive interface that allows IT administrators to manage all RDP connections centrally. This centralized approach also simplifies access, allowing users to access their desktops using remote desktop client RDP connections securely without disrupting their work routine. With centralized RDP connections, employees can work from anywhere, at any time, while organizations maintain complete control over their desktop environment. In conclusion, centralizing RDP connections with our management solution online is the perfect way for businesses to ensure an efficient and secure remote access experience for their users.


